
Connect Firebase in about ten minutes.
FluentNotify sends through Firebase Cloud Messaging, Google's free push service. Setting it up means creating a Firebase project, collecting three credentials from it, and pasting them into the plugin. It takes about ten minutes and is done once.
Before you start
- A WordPress site served over HTTPS. Browsers only allow push on secure pages.
- A Google account for the Firebase console. Cloud Messaging is free and has no sending limit that matters for a community.
- If you are using FluentCommunity, version 2.9 or later of FluentCommunity Pro. Turn on new-post notifications under Portal Settings and enable notifications for at least one space, or members will have nothing to receive.
1. Install the plugin
There are two ways in, and they end in the same place.
- From FluentCommunity. Open Portal Settings, then Features & Addons, then Advanced Features & Addons. FluentNotify is listed under recommended plugins. Click Install FluentNotify, and when it finishes, View Settings.
- Upload the zip. Download FluentNotify, then in WordPress go to Plugins, Add New, Upload Plugin. Choose the zip, install and activate it.
Either way you end up on FluentNotify's Settings screen in the WordPress admin. Keep it open in one tab and the Firebase console in another.
2. Create a Firebase project
- Go to console.firebase.google.com and sign in.
- Click Create a project and name it after your site. The name only appears in the console.
- Firebase offers Gemini and Google Analytics along the way. Neither is needed for push, so you can turn both off.
- Click Create project and wait for it to finish.
3. Register a web app
A Firebase project can contain several apps. Your site is a web app.
- On the project overview, click the gear next to Project Overview and choose Project settings.
- On the General tab, scroll to Your apps and click the web icon, the one that looks like
</>. - Give it a nickname such as your site's name. Leave Firebase Hosting unchecked.
- Click Register app.
4. Copy the web app config
After registering, Firebase shows a code snippet containing a firebaseConfig
object. You can find it again later under Project settings, General, Your apps, SDK
setup and configuration, with Config selected.
- Select everything from the opening
{to the closing}of thefirebaseConfigobject and copy it. - In FluentNotify's Settings, paste it into the field under Web app config.
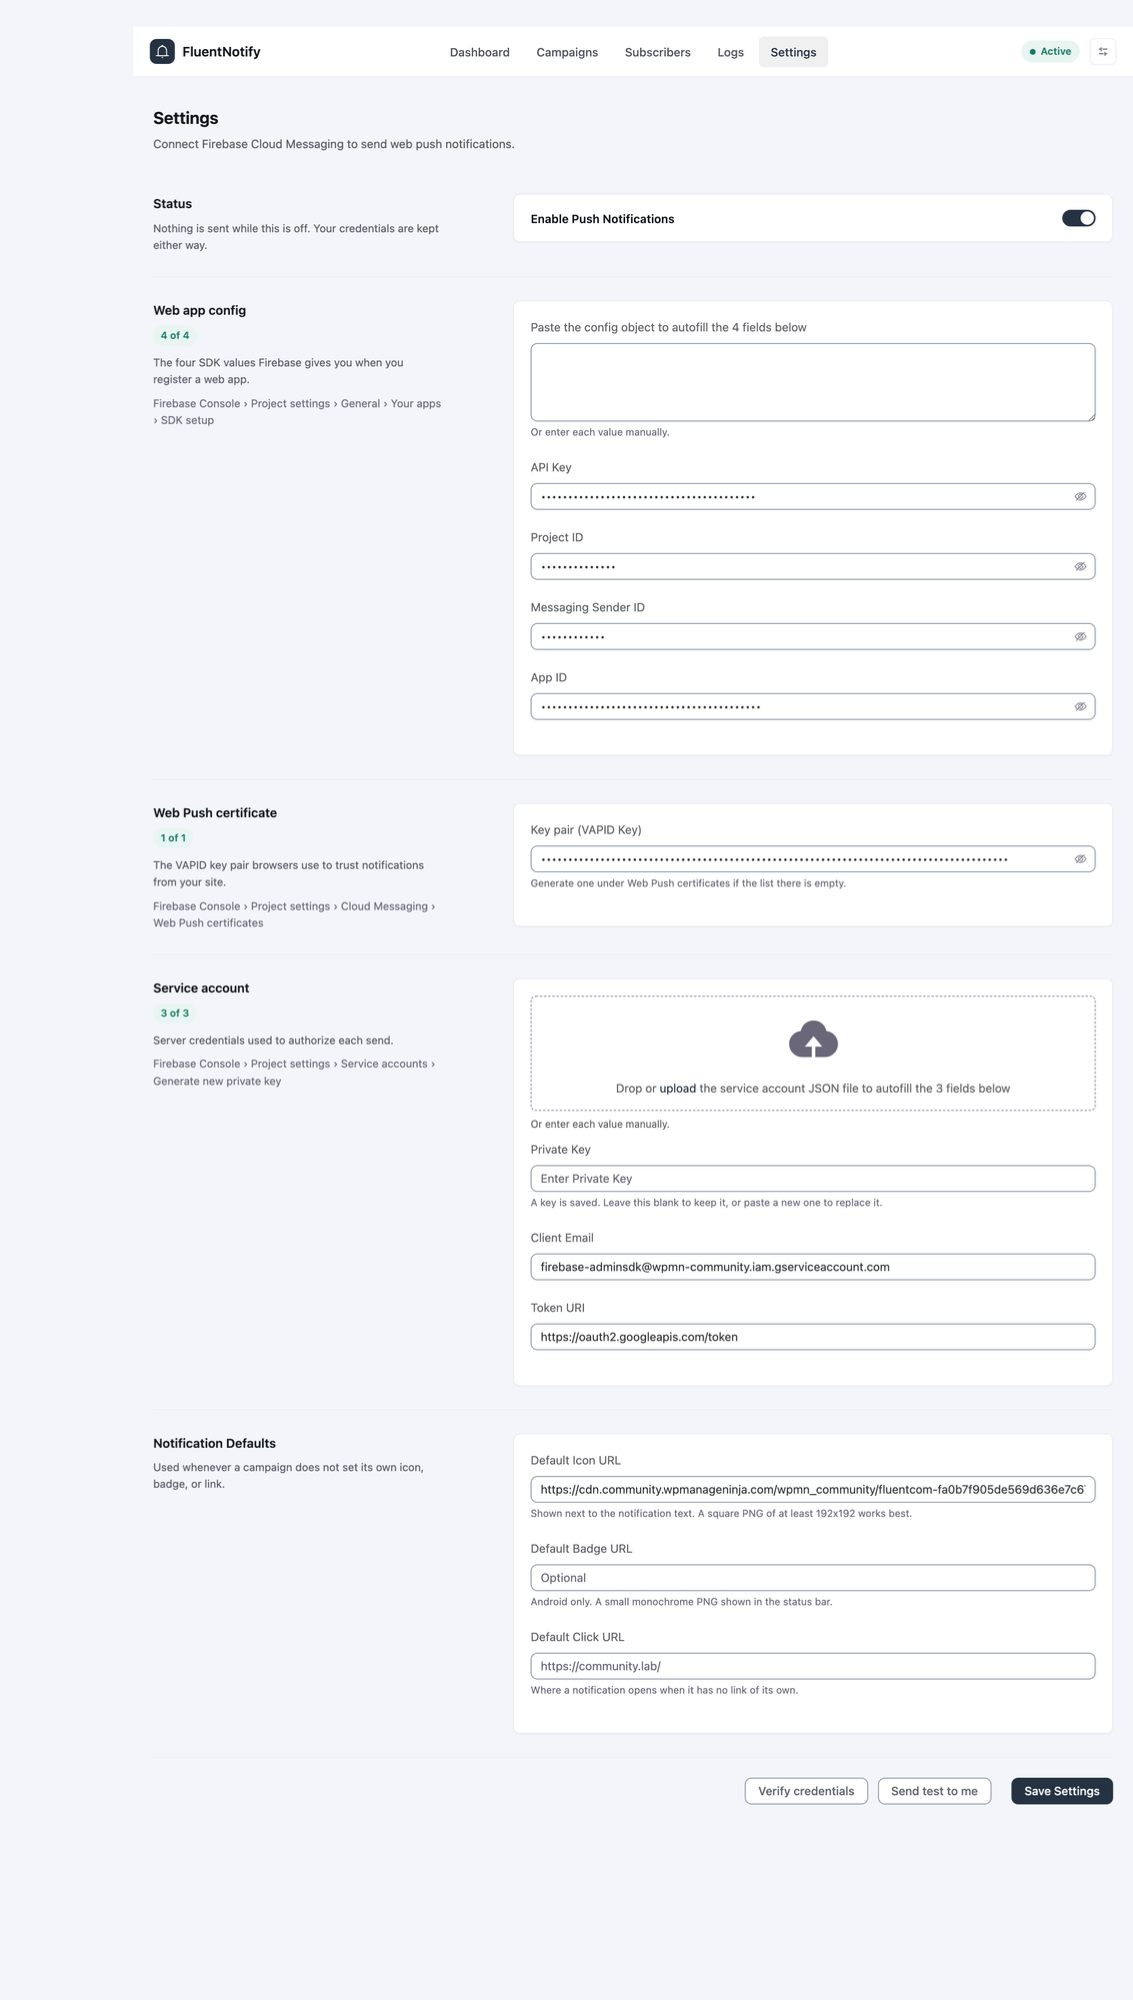
The plugin reads the four values it needs, the API key, project ID, messaging sender ID and app ID, and fills them in below the field. You do not have to convert the snippet to JSON or remove anything first. If a value did not come through, you can type it in by hand.
5. Get the VAPID key
This is the public key a browser uses to confirm that notifications really come from your project.
- Still in Project settings, open the Cloud Messaging tab.
- Scroll to Web configuration, then Web Push certificates.
- If there is no key pair yet, click Generate key pair.
- Copy the key and paste it into Key pair in FluentNotify.
6. Download a service account key
The service account is what lets your server send. It is a JSON file, and Firebase only hands it out once, so keep it somewhere safe.
- In Project settings, open the Service accounts tab.
- Make sure Firebase Admin SDK is selected, then click Generate new private key and confirm.
- A
.jsonfile downloads. In FluentNotify, click the upload area under Service account and choose that file.
The plugin reads the private key, client email and token URI from the file and stores them in your WordPress database. The file itself is not kept. If you ever lose it, generate a new key in Firebase and upload that instead. Old keys can be revoked from the same tab.
7. Connect Firebase in FluentNotify
With the three credentials in place, the Settings screen shows each section as complete.
- Click Verify credentials. FluentNotify asks Firebase for an access token and reports whether the service account was accepted.
- Turn on Enable Push Notifications. Nothing is sent while this is off, even with valid credentials.
- Click Enable & send test. Your browser asks for permission to show notifications. Allow it, and a test notification arrives within a few seconds.
- Click Save Settings.
Your own browser is now the first subscriber, and it appears under Subscribers. The button changes to Send test to me, which you can use any time.
8. Set the notification defaults
These are used when a notification does not bring its own icon, badge or link.
- Default icon. A square PNG, at least 192 by 192 pixels. Your logo on a plain background works well. It appears next to every notification.
- Default badge. Android only. A small monochrome PNG shown in the status bar. A white glyph on a transparent background is the expected format.
- Default click URL. Where a notification without its own link opens. Your community home page is a sensible choice.
Under Data you can also choose whether deleting the plugin removes its tables. It is off by default because a subscriber list cannot be rebuilt: every entry is a permission a member granted in their browser.
9. Turn it on for members
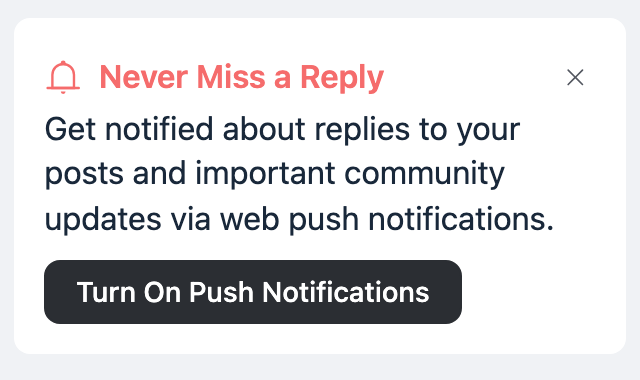
With FluentCommunity, nothing more is needed. Members see a short "Never miss a reply" prompt on their profile with a Turn On Push Notifications button. Clicking it opens the browser's own permission dialog, once per device. They can dismiss the prompt for a week if they are not ready.
From then on, comments on their posts, replies to their comments, mentions and new posts in spaces they follow arrive as notifications on their desktop or phone, and in the in-app bell at the same time. In their notification preferences, members choose email or push for each kind of activity, and you set the defaults under Portal Settings for anyone who has not chosen.
Without FluentCommunity, FluentNotify records logged-in users who grant permission, and you reach them from Subscribers, one device at a time. Campaigns to everyone or a segment are coming soon, and a subscribe prompt for any WordPress page is in progress.
If something does not work
- The test never arrives
- Check that your operating system allows notifications from the browser, and that focus or do-not-disturb mode is off. On macOS this is under System Settings, Notifications. If the site's permission was blocked earlier, reset it from the lock icon in the address bar and try again.
- Verify credentials fails
- The service account file usually belongs to a different Firebase project than the web app config. All three credentials must come from the same project. Generate a fresh key from the right project and upload it.
- Members do not see the prompt
- The prompt only appears on HTTPS pages, only for logged-in members, and only once all three credential sections are complete and push is enabled. Members who already granted or blocked permission on that device will not see it again.
- Campaign report shows "UNREGISTERED" or "SENDER_ID_MISMATCH"
- Those devices subscribed under a different Firebase project, or the browser dropped the subscription. FluentNotify marks them invalid so they are skipped next time. If it happens to everyone after you changed projects, members need to grant permission again.
- iPhone and iPad
- Safari on iOS 16.4 or later supports web push only for sites added to the Home Screen. Ask members to use Share, then Add to Home Screen, and open the site from there before turning notifications on.
For the FluentCommunity side of the setup, the FluentCommunity documentation has screenshots of each Firebase screen.